The Raspberry Pi Zero W P4wnP1 A.L.O.A. (A Little Offensive Application) image is a highly customized version of Kali Linux. It allows you to connect the Raspberry Pi to a computer or mobile device, sending and executing commands or acting as a HID (Human Interface Device).
P4wnP1 A.L.O.A. & Raspberry Pi Zero W
Introduction
The P4wnP1 A.L.O.A (by MaMe82) framework turns a Raspberry Pi Zero W into a flexible, low-cost platform for pentesting, red teaming and physical engagements or into “A Little Offensive Appliance”. It includes many features from the original P4wnP1, such as Plug & Play USB device emulation, and Wi-Fi via a modified version of the Nexmon firmware enabling KARMA attacks. It provides Bluetooth support and Wi-Fi covert channel. Even if the monitor mode is included, it is not supported. Additionally the project also introduces HIDScript which is JavaScript-based scripting language for payloads similar to DuckyScript.
Some of the features the P4wnP1 A.L.O.A. provides:
- Kali Linux distro with its pre-installed tools.
- Configuration and Control via web client or CLI.
- HIDScript to deliver payloads which is an improved version of DuckyScript scripting language
- A drive-by attack on Windows to deliver in-memory code that downloads stage 2 via HID covert channel using keystroke injection via HIDScript.
- Rougue AP (Access Point)
- HID (Human Interface Device) to mimic devices like keyboard, mouse, or network interface.
- Keystroke injection (right away just after the P4wnP1 is connected to a USB port)
- Wi-Fi covert channel server to facilitate “secret” communication
- Stager, which delivers the Wi-Fi covert channel client agent via HID covert channel, as soon as the keystroke injection starts
- USB setup for direct access to the target machine
- Deployment of a Bluetooth or Wi-Fi setup, which allows remote access to P4wnP1
- A single point of entry, to deploy all the needed configurations at once (done by a Master Template)
Hardware
If you want to give the P4wnP1 A.L.O.A. a live you’ve got to get the hardware to flash it into. Here is a list of what you will need to build it yourself:
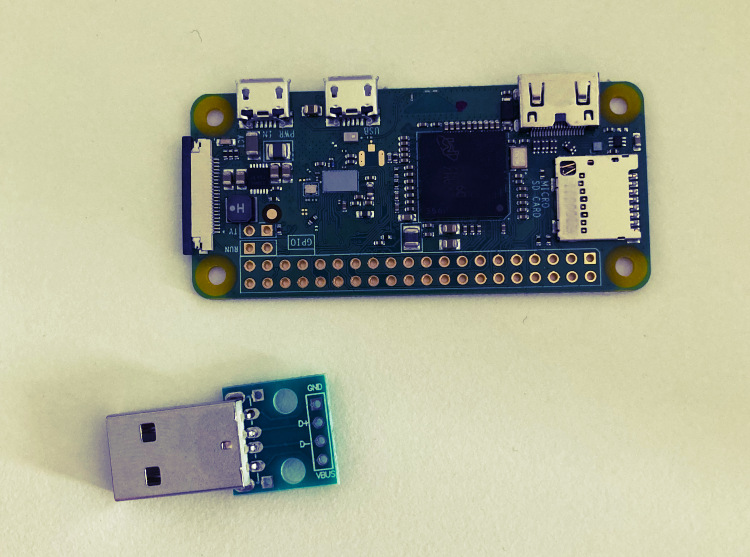
- Raspberry Pi Zero W (not W2 - it will not work - it has a different chipset)
- micorSD card (class A or B) with at least 16GB. It can be larger but takes a bit longer to boot up the P4wnP1.
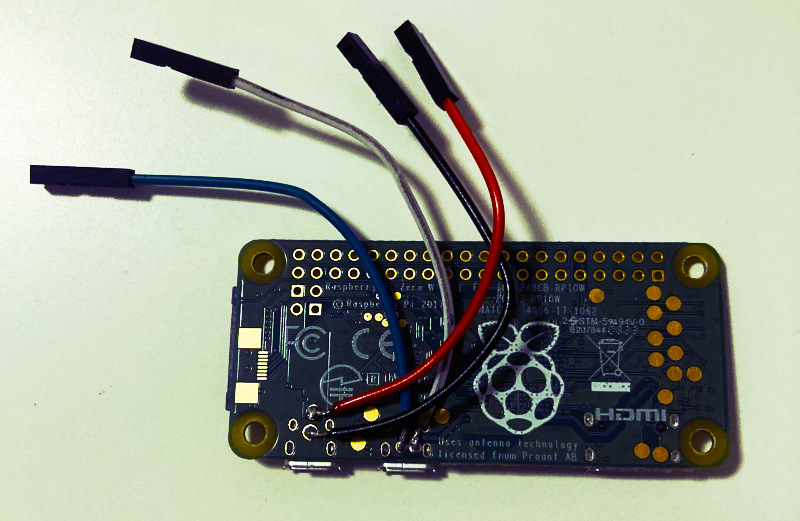
- Optional (for a USB dongle-like design): Depending on how you aproach the desing you might need a USB-A board/addon, a USB connector, or a male USB-A breakout board. Additionally, if you choose not to buy a ready-to-use USB-A addon board that does not require soldering, and you want your P4wnP1 to resemble a USB stick, some light soldering will likely be necessary. You will need some basic things like soldering Iron, solder, some jumper wires (or just wires), and pin headers.
- Optional (for a device protection): It’s advisable to equip your Pi with a case for protection against physical damage and to keep it secure.
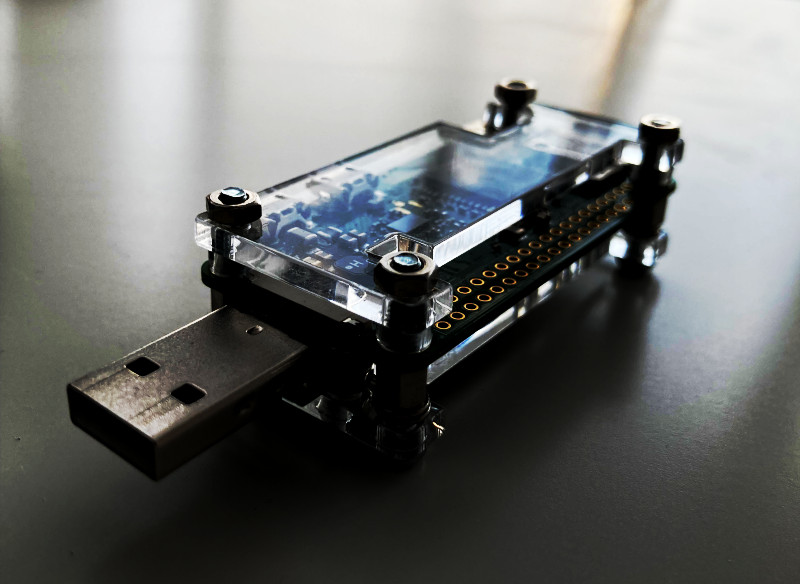
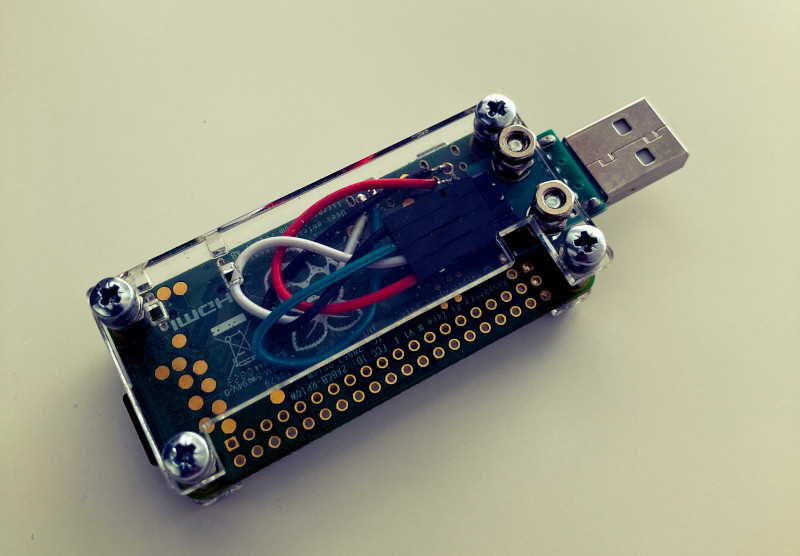
In this project, I set out to create a Raspberry Pi device that resembles a USB stick. While my design aimed for a compact and portable tool for penetration testing, it ultimately turned out to be a bit larger than a standard USB stick. I chose to emphasise a unique aesthetic design, accepting that this would come at the expense of size. Integrating a male USB-A breakout board with the Raspberry Pi required some light soldering and careful assembly. My goal was to ensure that the final design deliveres performance and flexibility while also having a memorable visual appealappeal. However, nothing prevents you from building the device to be more discreet if that is your preference.
Tip: If you don’t know how to solder, check out this video to get started with soldering. Futhermore it’s recommended to practice soldering before you jump into your raspberry Pi to solder its parts. It is a tiny board with tiny pins, so you have to be cerful to avoid damaging the components or the circuit board.
|
 |
 |
 |
|---|
Software
Download the Kali P4wnP1 ALOA Image
Download the Kali Linux Raspberry Pi Zero W P4wnP1 ALOA image from the project’s GitHub releases page
Note: MaMe82 developer is now using the handle “RoganDawes”, so don’t worry you are at the right repository.
Flash Image to the Raspberry Pi Zero W
Note: This process will wipe out your microSD card. If you choose the wrong storage device, you may wipe out your computers hard disk.
Use the dd utility to image this file to your microSD card. In our example, we use a microSD which is located at /dev/sdX. Change this as needed. Use a high-quality Class A1 microSD card with at least 16GB. The bigger the size of your microSD card, the longer it takes to boot up your P4wnP1. Personally, I used a 128GB card, and it is still booting quickly.
The xzcat command will open the compressed image file and pipe it to the dd command, which will do the actual writing to the microSD card. Using xzcat is a handy trick because it eliminates the need to decompress the image beforehand. Let’s say your SD card’s device name is /dev/mmcblk0 the actual command to execute would look like:
$ xzcat kali-linux-v0.1.1-beta-rpi0w-nexmon-p4wnp1-aloa.img.xz | sudo dd of=/dev/mmcblk0 bs=4M status=progress
Note: This process can take a while, depending on your PC, your microSD card’s speed, and the size of the Kali Linux image.
Once the dd operation is complete, you can verify 2 partions were created on your SD card using fdisk command. Use the following command to veirfy that.
sudo fdisk -l | tail -3
For example, the above command would return something like this:
Device         Boot  Start      End  Sectors   Size Id Type
/dev/mmcblk0p1           1   250000   250000 122.1M  c W95 FAT32 (LBA)
/dev/mmcblk0p2      250001 12286047 12036047   5.7G 83 Linux
If everityhing looks good, plug the microSD card into your Raspberry Pi Zero W.
Conectivity
Here are the default networks as provided by the standard P4wnP1 image.
| Network | Type | CIDR | Pi Address | DHCP Host Range |
|---|---|---|---|---|
| A | USB Eth | 172.16.0.0/30 | 172.16.0.1 | 172.16.0.2 |
| B | WiFi | 172.24.0.0/24 | 172.24.0.1 | 172.24.0.10 – 172.24.0.20 |
| C | Bluetooth | 172.26.0.0/24 | 172.26.0.1 | 172.26.0.2 – 172.26.0.20 |
There are several methonds you can use to connect to your P4wnP1.
Default SSH credentials are as follows:
login: root
pwd: toor
Wi-Fi Interface
Plug in your Pi into your PC via Micro USB cable (or a famle USB-A if you soldered it in) to power on the device. If you use a Micro USB - USB-A cable to connect your PC to a microUSB port of the Pi, make sure that the correct “Data” port is being used instead of the power port.
Next, from your PC or another computer, connect to the P4wnP1’s wireless network with its default login information:
SSID: 💥🖥💥 Ⓟ➃ⓌⓃ🅟❶
PSK: MaMe82-P4wnP1
Once you are connected to the P4wnP1 A.L.O.A. wireless network, you can access the system via either:
- The web interface:
http://172.24.0.1:8000 - SSH:
ssh root@172.24.0.1, then run theP4wnP1_clicommand - Locally compile the P4wnP1 A.L.O.A. CLI software, and pass
hostalong with your commands
USB Interface
If you want to connect to your P4wnP1 but you are not connected to P4wnP1 Wi-Fi, you have to use USB network interface with different IP address, which by default is: 172.16.0.1.
Notice we have 3 different interfaces assigned on P4wnP1, each with its IP address. Wi-FI:
172.24.0.1, USB:172.16.0.1, Bluetooth:172.26.0.1.
When you pluggin your Pi into your PC using USB cable, and OS boots up, then your can access it via one of the following options:
- The web interface:
http://172.16.0.1:8000 ssh root@172.16.0.1
Network Configuration
SSID & PWD Change
One of the first things you probably want to do is to change a default SSID name and password of your P4wnP1 Wi-Fi . After all, you don’t want to expose your glowing Wi-Fi name such as 💥🖥💥 Ⓟ➃ⓌⓃ🅟❶ that attracts attention. Addtionally, having a default password is not a good idea though.
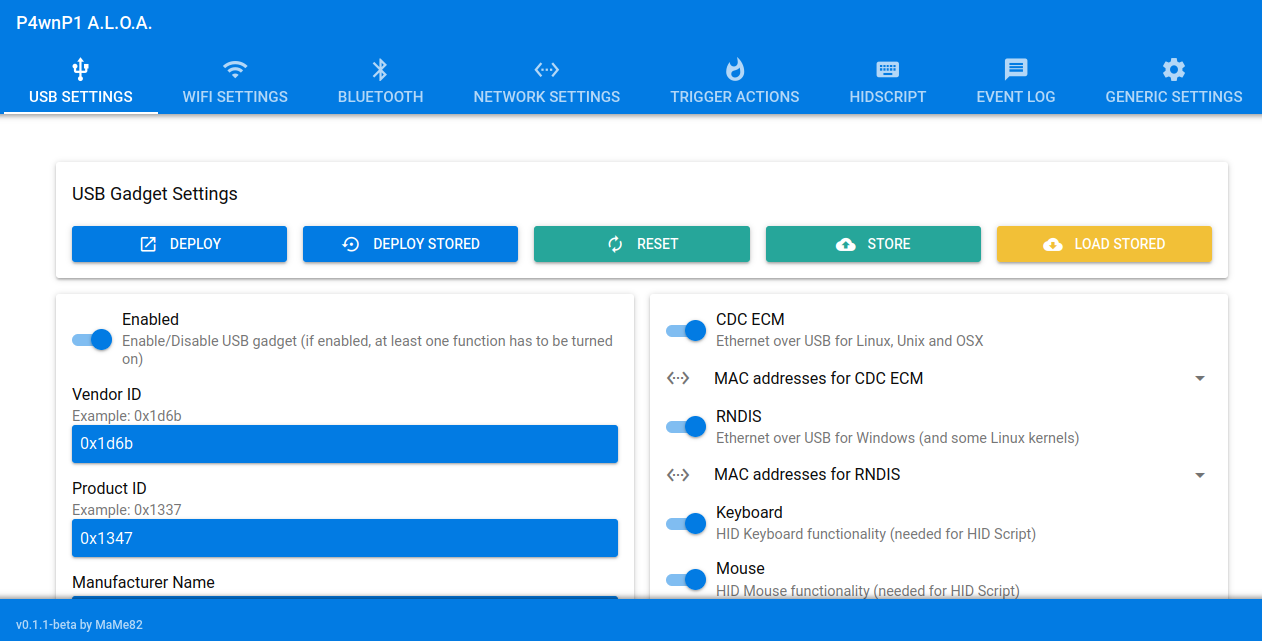
First, open up your browser and go to http://172.16.0.1:8000. The P4wnP1’s web interface should be displayed (before moving on to WIFI settings, here in USB SETTINGS can change defaults names to something less suspicious if you want to).
In order to change default SSID and password (PSK) execute the steps as follows:
- Go to the
WiFi Settingstab. - Change
SSIDandPre shared keyunderWiFi Access Point settings - Hit the
DEPLOYbutton in the top left to apply your settings. - Next, Click
STOREto save the settings. - Provide a name you prefer and click OK.
Note: In case P4wnP1 defaults to its setings you can use
LOAD STOREDtab and select a name of Wi-Fi settings you created before usingSTOREtab.
Tip: Every time the P4wnP1 gets rebooted its default settings are loaded. If you want your settings at the statup you have to either overwrite the existing statup template (with the same
statupname) or to update generic startup template inGENERIC SETTINGS. While overriding the existing value here might be helpfull I recommend the second way as it gives more flexebility. In order to do it, go toGENERIC SETTINGSand click onLOADselectstartup, then on the lefft, underWIFI-SETTINGS, changestartuptemplate to the one you defined before. Now save the sttings under your custom name usingSTOREtab and then again usingSTOREtab provide exsiting template name calledstartupto update its settings. Now, when you reboot you Pi, you will get your custom settings loaded automatically.
Enabling Internet Access
Now, let’s configure a wireless interface so that we can have an internet connection. This allows us to update and upgrade the Kali system to the latest version as well as extend capabilities of our P4wnP1 device.
- Go to the
WiFi Settingstab. - In the bottom left of your screen click the
Working Modedropdown and change it toClient with Failover to AP - In the middle of the page, enter your home network information.
- Hit the
Deploybutton in the top left to apply your settings. - Next, Click
STOREto save the settings under your preffered name. - Optionally: If you want those settings loaded after Pi reboot, ovewrite the exsiting
startuptemplate usingSTOREtab (just use the same namestartupwhen prompted for a name).
Note: Failover mode means that if the Pi can’t find or connect to your network it will start listening as an AP (Access Point) again. This makes it very easy to connect to the web interface when you take the device outside your home as it will fail to connect and start listening.
Info: Another option to get the internet access is selecting a
client modeinWifi settingsof the P4wnP1 web interface.
Update & Upgrade
Running P4wnP1 without Kali packages upgrade covers many use cases, however if you want to increase its power to even higher level you would need to perform the upgrade.
In the previous step we configured our device to get an internet connection. Now we are ready to update Kali 2020 to the latest version.
When you run apt-get update && apt-get upgrade command at the first time you might get an error like that:
Get:1 http://kali.download/kali kali-rolling InRelease [41,5 kB]
Err:1 http://kali.download/kali kali-rolling InRelease
  The following signatures were invalid: EXPKEYSIG ED444FF07D8D0BF6 Kali Linux Repository <devel@kali.org>
Fetched 41,5 kB in 2s (20,0 kB/s)
Reading package lists... Done
W: An error occurred during the signature verification. The repository is not updated and the previous index files will be used. GPG error: http://kali.download/kali kali-rolling InRelease: The following signatures were invalid: EXPKEYSIG ED444FF07D8D0BF6 Kali Linux Repository <devel@kali.org>
W: Failed to fetch http://http.kali.org/kali/dists/kali-rolling/InRelease  The following signatures were invalid: EXPKEYSIG ED444FF07D8D0BF6 Kali Linux Repository <devel@kali.org>
W: Some index files failed to download. They have been ignored, or old ones used instead.
Reading package lists... Done
Building dependency tree
Reading state information... Done
Calculating upgrade... Done
0 upgraded, 0 newly installed, 0 to remove and 0 not upgraded.
Solution: Import and make the imported Kali key trusted.
root@kali:~# wget --no-check-certificate -q -O - https://archive.kali.org/archive-key.asc | apt-key add
Now you should be able to update package repository and upgrade packages on the system to the latest version.
apt-get update && apt-get upgrade
Note: If you want to get utilities included in the Kali Full distro, additionally type this command:
apt-get install kali-linux-full
When I upgraded Kali’s packages to the latest version (2025), I encountered some difficulties with the upgrade. After runing apt-get upgrade command I got depedncy issue for python3-netaddr_1.3.0-1 package, as follows:
Errors were encountered while processing:
 /tmp/apt-dpkg-install-INA5rF/021-python3-netaddr_1.3.0-1_all.deb
E: Sub-process /usr/bin/dpkg returned an error code (1)
and
Unpacking python3-netaddr (1.3.0-1) over (0.7.19-3) ...
dpkg: error processing archive /var/cache/apt/archives/python3-netaddr_1.3.0-1_all.deb (--unpack):
 trying to overwrite '/usr/bin/netaddr', which is also in package python-netaddr 0.7.19-3
dpkg-deb: error: paste subprocess was killed by signal (Broken pipe)
Errors were encountered while processing:
 /var/cache/apt/archives/python3-netaddr_1.3.0-1_all.deb
E: Sub-process /usr/bin/dpkg returned an error code (1)
To fix it I went through full-upgrade, removing old and installing new netaddr package, fixing any broken dependencies and running the full-upgrade again, and finally cleaning up any unnecessary packages to free up disk space. The following commands might help in solving this issue:
apt full-upgrade -y
apt remove python-netaddr
apt install python3-netaddr
apt --fix-broken install
apt full-upgrade -y
sudo apt autoremove
sudo apt clean
Once you finshed the upgrade you get fully operational Kali Linux distro along with the P4wnP1 functionality. Upgrading process is time-consuming so to save time in case you want to restore the latest version of the image you can clone the existing working setup. Follow the following steps to get a full backup of your P4wnP1.
Plug in the SD card into a computer and verify the name of the device. Usually it will get a name like mmcblkX or sdcX.
sudo fdisk -l | tail -n3
Device         Boot  Start       End   Sectors   Size Id Type
/dev/mmcblk0p1           1    250000    250000 122.1M  c W95 FAT32 (LBA)
/dev/mmcblk0p2      250001 242481663 242231663 115.5G 83 Linux
Unmount the device:
sudo umount /dev/mmcblk0
Create backup image of P4wnP1:
sudo dd if=/dev/mmcblk0 of=P4wnP1-ALOA-2025.img bs=4M status=progress
This command will take some time to complete as it copies the entire disk to a target storage.
If you want to clone the backup image to another SD card or USB (or to your existing SD card becuase, for example you messed up you OS and you want to revert the changes), make sure your SD card (or another storage device) is unmounted and empty without any partion on it (if yes delete it) and then clone the image to the divice. Let’s say our SD is called /dev/mmcblk0, we can run the following command to write the image into the card:
sudo dd if=P4wnP1-ALOA-2025.img of=/dev/mmcblk0 bs=4M status=progress
Options and Features
Here is the list of the most important options and their examples of usage:
-
layout(’us’)sets the keyboard layout to use on the target system. -
typingSpeed(100,150)waits 100 ms + an additional random value from 0 to 150 ms between keystrokes (natural for human). This can be used to reduce the speed of keystrokes so that the target system is fooled into thinking it’s a natural user. -
typingSpeed(1,0)the same as above - waits 100 ms between key strokes + an additional random value between 0 ms and 150 ms (natural for human) -
press("GUI r")simulates pressing theWindows+Rkey combination. -
delay(700)forces a pause until the next command execution (700 ms). -
type("notepad\\n");simulates the notepad keyboard input and finishes the input with theEnterkey. -
("CTRL E"),press("GUI UP"), andpress("CTRL ALT DELETE")simulate pressing a corresponding key or key combination. -
waitLED(NUM)waits with the execution of the script until theNumLockkey has been pressed (depending on hardware and operating system).
Addtionally P4wnP1 can be used in shell scripts allowing you to not only configure the P4wnP1 but also use it for a different attacks. Some example commnds are:
• P4wnP1_cli led -b 0 and P4wnP1_cli led -b 3 switch the internal LED of the P4wnP1 off (0) or to flashing status (three times).
• P4wnP1_cli net set server -i usbeth -a 172.16.0.1 -m 255.255.255.252 -o "3:172.16.0.1" -o "6:" -r "172.16.0.2|172.16.0.2|5m" configures a network interface (IP address, network mask, gateway, DHCP range, etc.) with the respective specifications.
-
P4wnP1_cli hid run -n lockpicker.jsexecutes a HID script (here lockpicker.js) stored on the P4wnP1. -
P4wnP1_cli db backuporP4wnP1_cli db restorecreates a backup of the internal database of the P4wnP1 or restores it. -
P4wnP1_cli template deploy -t lockpickerdefines a specific template on the P4wnP1. -
P4wnP1_cli net set server -hhelp for the specified command.
Backup
Creating a Backup
It is always good idea to create a backup of existing working configuration. Before you make critical changes to P4wnP1 configuration, create a database backup. This could be done using one of the following options:
- via the web interface in
Generic Settingstab. - via CLI, with the
P4wnP1_cli db backupcommand.
The backup will be stored in the folder /usr/local/P4wnP1/db/ under the name you provided.
Note: A backup contains all stored templates (USB, WiFi, Network, Bluetooth, TriggerActions, MasterTemplates) and the Startup Master Template which has been set. The backup doesn’t include HIDScripts or BashScripts - they are stored as files in a different location:
In case you want to backup the HID Scripts, you need to copy the following folder to the target storage:
/usr/local/P4wnP1/HIDScripts/
Restoring a Backup
The restore function or P4wnP1_cli db restore command could be used to restore a given backup. A backup contains all stored templates (USB, WiFi, Network, Bluetooth, TriggerActions, MasterTemplates) and the Startup Master Template which has been set. The backup doesn’t include HIDScripts or BashScripts, as both are stored as files to allow easy editing.
Issues & Troubleshooting
No access to P4wnP1 & no backup available
If you don’t have a backup and can’t acces your p4wnP1 you can try to re-create a database.
When P4wnP1 A.L.O.A. starts, it checks if a database exists. If the database doesn’t exist it fills a new database based on an initial backup which ships with P4wnP1 A.L.O.A.
The initial backup is stored at /usr/local/P4wnP1/db/init.db and should never be deleted or overwritten.
In order to force P4wnP1 to re-create a database the actual database has to be deleted. This could be achieved by mounting the P4wnP1 A.L.O.A. SD card on a system (that support mounting and writing to EXT partitions).
When you mounted P4wnP1 partition, delete the entire folder /usr/local/P4wnP1/store from the SD card’s root partition. For example, when you mounted it to /mnt/ you could do the following: cd /mnt/ && rm -rf ./usr/local/P4wnP1/storeThis deletes the database and forces re-creation during the next boot of P4wnP1.
No access to P4wnP1 & backup available
In addition to deletion of the /usr/local/P4wnP1/store replace the /usr/local/P4wnP1/db/init.db file with the one from your backup. Before you do it, make sure you have a backup copy of init.db.
Once done, this should re-create your provided DB once P4wnP1 is rebooted.
Startup Master Template of the Backup is faulty
If you have a backup for which the Startup Master Template doesn’t work. You have to do some additional steps, as it isn’t possible to change the Startup Template directly in a backup.
First re-create the initial P4wnP1 database following the procedure already described above. After a reboot of P4wnP1, you should be able to access P4wnP1’s web interface remotely, again.
Then, go to the Generic Settings and restore your own backup that was with the misconfigured Startup Master Template.
The Startup Master Template should show your “broken” Master Template as selected. If this isn’t the case, reload the browser tab hosting the webclient application.
Again, navigate to the Generic Settings tab and select a Startup Master Template which is known to work.
At this point you should be ready to reboot.
If none of the above helped to restore access to you P4wnP1, you have to re-create your P4wnP1 A.L.O.A. SD crad from a clean image.
This will include removing 2 partitions on you P4wnP1 first and then executing xzcat command to flash a fresh image. It might be achieved by the following steps:
- Take out the SD card from you Raspberry P1 and put into PC.
- Identify the SD card’s device name. You can use
lsblkorsudo fdisk -lcommand. - Identify mounting poitns of P4wnP1’s partitions mounted on a system, for example by using
mountmount. - Unmount partions using
umountcommand. - Delete partions from the SD card using
sudo fdisk /dev/mmcblk0command, wheremmcblk0is the name of you SD card you identified before. While infdisktypedto delete a given partion and typewwhen finished, to save changes and exit thefdiskutility. - Execute the following command to flash a fresh image:
xzcat kali-linux-v0.1.1-beta-rpi0w-nexmon-p4wnp1-aloa.img.xz | sudo dd of=/dev/mmcblk0 bs=4M status=progress
⚠️ Disclaimer: The content on this site is for educational purposes only and should be used responsibly in authorized environments. Unauthorized actions may be illegal. Read the full disclaimer .